Using Data Collector
Learn how to build Data Collector apps, fully customisable forms used by field users to capture and transmit information to AppCan Cloud in real-time.
Create Data Collector App
To create a new Data Collector App, select ‘Apps’ on the top menu.
![]()
Click on the ‘Create New App’ button
![]()
A pop-up will appear
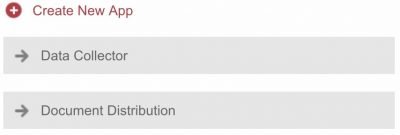
Select ‘Data Collector’
Configuring a Data Collector App
Data Collector apps are fully customisable forms used by field users to capture and transmit information to AppCan Cloud in real-time.
Upon selecting the ‘Data Collector’ option from the pop-up window (as shown above), the following screen appears:

App Name
Enter the name of the app in the ‘App Name’ field.
Sections
A ‘Section’ enables a user to group multiple ‘Field Names’ under an appropriately labelled Section. Each app must contain at least one Section, however, an app can support multiple (and an unlimited number of) Sections..
To add a new Section, tap/click on the ‘Add Section’ button located to the right of the ‘App Name’ field
![]()
Fields
With a Section defined, a user can now add, label and configure (if applicable) one or more ‘Field Types’ within a Section.
To add a Field Type, tap/click on the ‘Add Field’ button to the right of the Section Name field.
Once a field has been added, a user has 12 different Field Types available with no limit on the number of Field Types that can be included in a Section. The Field Type options are as follows.
Field Names
Field names must be unique for the app. You cannot have the same field name duplicated, for example, using ‘Date’ as a field name more than once. The reason for having a unique field name is for reporting purposes in Form Builder.
It is also advisable to ensure the field name are meaningful for the user of the app.
If you wish to rename a field, please ensure that field name hasn’t already been used in the app.
You can hide a field (once published) and reuse the field name, but you will need to rename the hidden field first, Publish or Save the app, and then you can reuse the original field name.
For instance, if you have a field name called ‘Expenses Type’, with a field type of Text, and you want to now have another field called ‘Expenses Type’ but with a Select field type – you should rename the original field to something like ‘Expenses Type Old’, hide the field and then Save or Publish the app.
Now you can add a new field of ‘Expenses Type’ with the Select field type, and then Publish or Save.
Field Types
Once a field has been added, a user has 12 different Field Types available with no limit on the number of Field Types that can be included in a Section. The Field Type options are as follows.
| Field Type | Description |
|---|---|
| Text | An open text field designed for single line/sentence responses (as opposed to the ‘Note’ field – see further down for more details – which is designed for multiple line/sentence responses).
There are no restrictions regarding the number of characters allowed in a Text field although special characters such as (but not limited to) ^ + = | ~ < > are not allowed (a field user is actually unable to enter them in this or any other text based field). |
| Date & Time | Prompts a field user to select a date (month, date and year). |
| Date | Prompts a field user to select a date (month, date and year). |
| Time | Prompts a field user to select a time (hours, minutes, am/pm) |
| Select | A drop down menu of fully customisable options that a field user can select from (once defined) although only one option can be selected. |
| Multi-Select | A drop down menu of fully customisable options that a field user can select from (once defined). Unlike the ‘Select’ field option, however, the ‘Multiple Select’ field allows a field user to select one or more options from the drop down (as opposed to selecting just one option with the Select field option). |
| Photo | Prompts a field user to take a photograph (which includes the GPS coordinates associated with the location that the photograph was taken).
NOTE: The field user will need to grant access to ‘Location Services’ and the ‘Photos’ library on their iOS device in order to take photographs. |
| Note | An open text field designed for multiple line/sentence responses (as opposed to the ‘Text’ field) which is designed for single line/sentence responses).
There are no restrictions regarding the number of characters allowed in a Note field although special characters such as (but not limited to) ^ + = | ~ < > are not allowed (a field user is actually unable to enter them in this or any other text based field). |
| Number | Prompts a field user to enter a number (with or without decimal places). When a field user taps/clicks on a ‘Number’ field on an iOS device, they are presented with the numerical keypad to eliminate the possibility of entering alpha characters by mistake. |
| Currency | Similar to the ‘Number’ field, except that it prompts a field user to enter a specific cost (with or without decimal places) as opposed to a general number. When a field user taps/clicks on a Currency field on an iOS device, they are presented with the numerical keypad to eliminate the possibility of entering alpha characters by mistake. |
| Signature/Sketch | Enables a field user and/or customer to add a signature and/or provide a sketch directly on an iOS device. |
| Location | Prompts a field user to log the GPS coordinates of their current location. The GPS Location field differs from the ‘Photo’ field in as much as the GPS Location field does not include the requirement to take a photo as well.
When data is exported or reported on in Report Builder, the Longitude, Latitude, Easting and Northing co-ordinates are shown. |
| Timer | ‘Timer’ is a countdown clock from a preset value set in the Data Collector app builder. On AppCan XP, the user is unable to submit the record until the Timer has reached zero. |
‘Select’ Field Type
Once the ‘Select’ field has been added, tap/click on the ‘red horizontal lines’ icon located under the column header ‘Options’. After the text for each option has been entered, tap/click the ‘Add’ button to add it as an option in the drop down.
To delete an existing option, tap/click on the ‘x’ icon to the far right of the applicable option. A drop down menu of fully customisable options that a field user can select from (once defined). Unlike the ‘Select’ field option, however, the ‘Multiple Select’ field allows a field user to select one or more options from the drop down (as opposed to selecting just one option with the Select field option).
Options Icon Indicator: When you create a Select, you can now see if any Options have been populated. A grey Options indicator means that no options have been entered, which changes to a red indicator if at least one option has been entered.
‘Multiple Select’ Field Type
Once the Multiple Select field has been added, tap/click on the ‘red horizontal lines’ icon located under the column header ‘Options’. After the text for each option has been entered, tap/click the ‘Add’ button to add it as an option in the drop down.
To delete an existing option, tap/click on the ‘x’ icon to the far right of the applicable option. If editing an existing and published App (see section on ‘Publishing an App’ for more details), even if an option within a Select drop down has been used in a prior app entry submission from a field user, the option can still be deleted from the list of options in the drop down.
Options Icon Indicator: When you create a Multiple Select field, you can now see if any Options have been populated. A grey Options indicator means that no options have been entered, which changes to a red indicator if at least one option has been entered.
Select & Multiple Select Bulk Upload
When using a Select & Multiple Select Field Type, you can upload options from an Excel Spreadsheet or CSV file, to prevent manual input.
Uploading Options
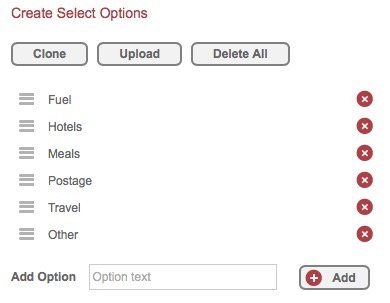
After adding the Select / Multiple Select field, select the 3 grey bar icon under the ‘Options’ column.

The ‘Create Select Option’ popup will show, as below:
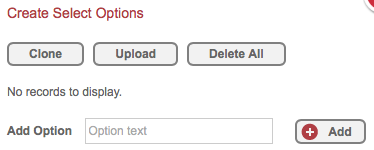
Select ‘Upload’ – you will be prompted to choose the Excel or CSV file from your local machine, after which the options will be uploaded. Continue to build your app and ‘Save’ or ‘Publish’ as required.
Upload Rules
- Your options must be in column A starting at row A1 in your spreadsheet, with no blank rows in column and no other columns in the file
- No duplicates are allowed in the options list (the system will advise you if duplicates exist)
- Ensure cells in the spreadsheet are formatted as Text
It is important that cells within the Excel spreadsheet are formatted as Text fields. If the field contains Text, Excel will automatically set the format as text. If you have a number field, for instance, as an option, this will need to be formatted as text. You can do this by:
- Selecting the required cell(s), choose ‘Format’ from the menu, select ‘Cells’ and then choose ‘Text’ from the available options
- Selecting the required cell(s), in the ‘Home’ Ribbon Bar change the ‘Number Format’ dropdown option to ‘Text’
- Use a leading apostrophe to indicate to Excel to ignore formatting
Deleting Options
You can delete all options in one go by selecting the ‘Delete All’ button.
A warning message will be shown:

After selecting ‘OK’, all options will be removed.
Mandatory Fields
Each Field Name added to a Section within an app can be marked as mandatory i.e. the field user must enter a response for that field. To define a field as mandatory, check the checkbox that corresponds to the applicable Field Name, under the Mandatory column header
All fields marked as Mandatory in AppCan Cloud will be marked with a red * when viewing the app in AppCan Mobile.

Smart Copy
Smart Copy allows a user of AppCan Mobile to create a new record, copying through the selected values captured in a submitted record.
Example
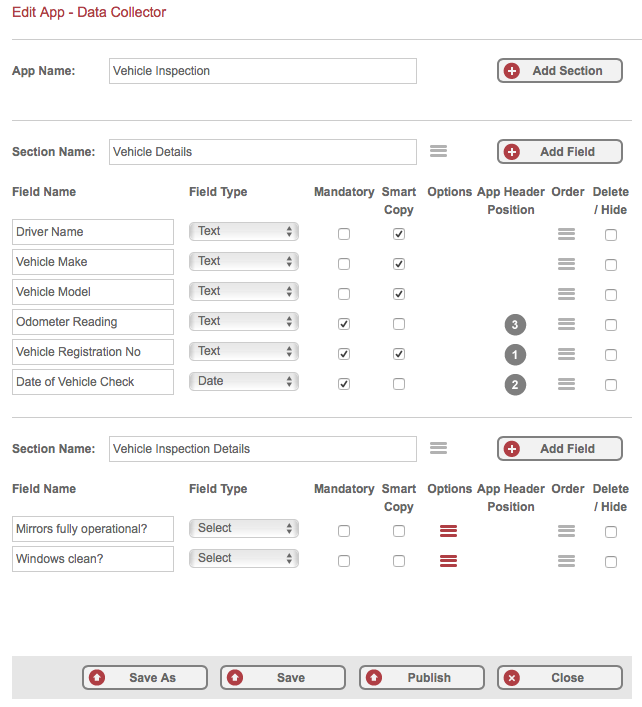
An example of this is a Vehicle Inspection App:
The user will enter the various required fields, including ‘Driver Name’, ‘Vehicle Make’, ‘Vehicle Model’ and ‘Vehicle Registration No’.
The user will probably enter the same information in these fields for each record recreated. By using Smart Copy, the information entered into these fields can be copied across to each new record.
To enable Smart Copy in a Data Collector App, check the required fields in the Smart Copy column for each field the user can copy to a new record.
You can add Smart Copy fields to any existing app, or new app created.
Remember: You will need to Publish your app after making changes to Smart Copy fields before user can create a Smart Copy record
If no Smart Copy fields are checked in a Data Collector App, the AppCan Mobile user will not have an option to Smart Copy a record.
Header Pins
Once a field user submits an app entry to AppCan Cloud, summary information is displayed against the submitted entry in AppCan Mobile
In order to define which Field Name(s) appear in a given app entry’s summary (in AppCan Mobile), tap/click, hold and drag an ‘App Header Position Pin’ (starting with the pin labelled ‘1’) and place it under the column header ‘App Header Position’, against the applicable field name.
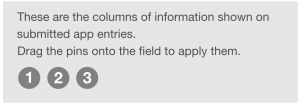
Every App must contain at least one App Header Position Pin i.e. the pin labelled ‘1’ must be associated with a Field Name.
If a 2nd and 3rd row of information is required in the app entry’s summary, repeat the process for pins ‘2’ and ‘3’
The Pin labelled ‘1’ indicates the field name that will appear in the 1st row of the app entry’s summary. Pins ‘2’ and ‘3’ correspond to the field names that will appear in the 2nd and 3rd rows of the app entry’s summary (if used).
A maximum of three App Header Position Pins can be assigned to a given App.
Cloning Select and Multiple Select Fields
You can clone the ‘Select’ and ‘Multiple Select’ fields, including all options entered.
Just click the ‘Clone’ button in the ‘Options’ popup.
The cloned field will appear at the bottom of the Section, using the same Field Name but with ‘_1’ – if another field is cloned from the original field, the field name will show with ‘_2’ etc.
Hiding & Deleting Fields
Hiding Fields
For apps that have already been published, a user has the ability to hide one or more field names that are no longer required in the app.
To hide an existing Field Name in a published app, check the box under the column header ‘Delete/Hide’ that’s associated with the applicable Field Name that should be hidden

The Field Name will be highlighted in light grey to indicate that the field will be hidden when the revision for the app is published (see section ‘Publishing an App’ for more details on this process). Once an app has been published, a user can not delete Field Names.
Deleting Fields
For apps that have not yet been published or for apps that contain revisions that have not yet been published, a user has the ability to delete Field Names
In the situation where an app has been published and subsequent revisions have then been made (but have not yet been published), a user can only delete the Field Names that were added as part of the unpublished revision. For fields that were included when the app was previously published, a user can only hide those Field Names.
To delete an existing Field Name, click on the ‘x’ under the column header ‘Delete/Hide’ that’s associated with the applicable Field Name that should be deleted.
The Field Name will disappear from the Section to indicate that the field will be removed when the app is published (see section ‘Publishing an App’ for more details on this process).
Once an app has been published, a user can not delete Field Names.
Reorder Fields & Sections
Reordering a Field Name
By default, when a Field Name is added to a Section, it appears at the bottom of the list of Field Names in that Section.
To change the order of a Field Name, tap/click, hold and drag the ‘grey horizontal lines’ icon (located under the column header ‘Order’) that’s associated with the applicable Field Name.
Move the icon either up or down to insert it in a new location within the list of Field Names.

Reordering a Section
By default, when a new Section is added to an app, it appears at the bottom of the list of existing Sections associated with that app.
To change the order of a Section, tap/click, hold and drag the ‘grey horizontal lines’ icon (located to the right of the Section Name field)
Move the icon either up or down to insert the Section in a new location.
Cloning Sections
You can clone an existing section, which is particularly useful where repeated sections are required in the app.
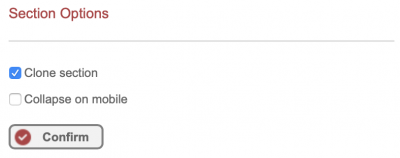
To clone a section, select the grey 3 dot icon after the Section name.
A popup with the Data Collector options will be shown.
Select the ‘Clone Section’ option and then click on the ‘Confirm’ button.
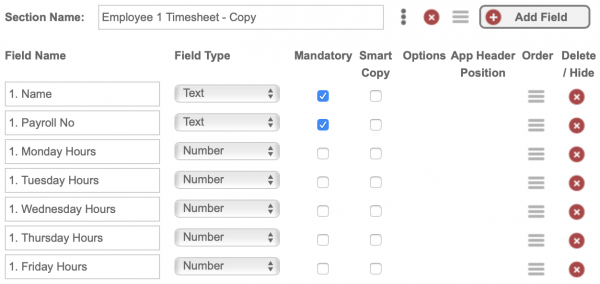
The cloned section will be created below the existing section, with ‘Copy’ after the Section Name to indicate the section was cloned.
Adjust the Section name as required, and change the Field Names in the cloned section to ensure you don’t have any duplicate name.
App Preview
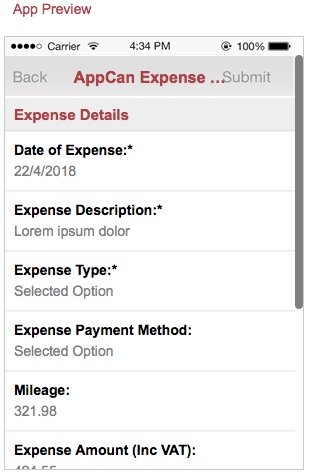
During the process of creating/editing an app, a real-time, fully scrollable preview of how the app will look in AppCan Mobile is displayed.
The ‘App Preview Pane’ is located on the right hand side of the ‘Edit App’ screen
Saving App
During the course of creating a new app or in the event that changes need to be made to an existing, published app (e.g. reordering a Field Name, adding a new Field Name etc), the option to save the current state of the app (without publishing it) is available.
This enables a user to create a new app/edit an existing app over a period of time as well as send an app through any internal approval process that may be in place within a given organisation, prior to publishing it to field users.
To save an app without publishing it or to save any revisions to an existing app without publishing the revisions, click on the ‘Save’ button at the bottom of the ‘Edit App’ screen
Once the app has been successfully saved, the user is returned to the ‘Manage Apps’ screen.
If the app in question is new (i.e. it has never been published), a light green banner will appear towards the top of the Manage Apps screen stating “The App was created successfully”
 and the entry under the ‘Published Date (Latest Version)’ column header will state “Saved Not Published” …
If the app in question has already been published (prior to any revisions that have just been made), a light green banner will appear towards the top of the Manage Apps screen stating “The App was updated successfully” …
 and the entry under the ‘Published Date (Latest Version)’ column header will state “Revision Not Published” …
In addition, for both new apps that have not yet been published as well as existing, published apps that contain revisions, a red banner will appear towards the top of the Edit App screen stating “This App has changes made that will not be visible on mobile devices until it is published”

Publishing an App
Once an app is ready to be published (be it a new app or an existing app with revisions), tap/click on the ‘Publish App’ button at the bottom of the ‘Edit App’ screen.
Once the process of publishing an app has been completed, the user is returned to the ‘Manage Apps’ screen and the ‘Published Date (Latest Version)’ column header is updated to reflect the date/time that the latest version of the app was published.
Save As
You can copy an existing Data Collector app into a new app, using the ‘Save As’ feature. This clones the existing app and makes an exact copy, including all field names, field types, mandatory selections, Select and Multi-Select options etc.
Cloning a Data Collector app is useful for several scenarios, for instance:
- Clone a Template App with standard company information used in each app.
- Tidy up a field test app, ready for live deployment.
- To deploy a similar app as an an existing app.
To create a clone of an app:
- Select the app you wish to clone and edit the app.
- Select the ‘Save As’ button

The ‘Save As’ popup box will be shown, where you can enter the name of the new app.
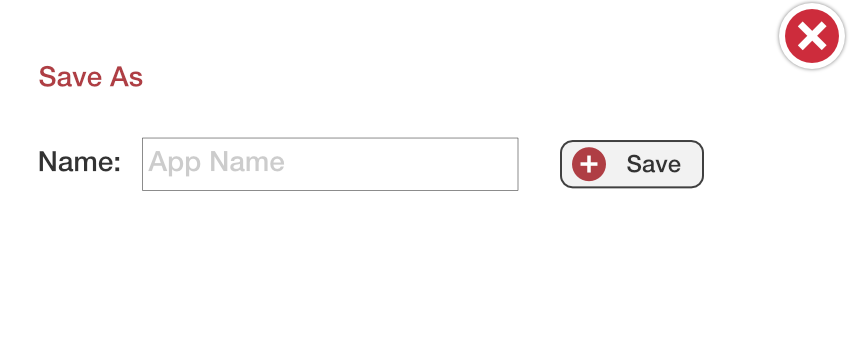
Enter the name of the new app, and select ‘Save’. Your ‘cloned’ app will appear in the app list, where you can make any necessary changes before publishing.
Cancel Changes to an App
Should a user want to either cancel the process of creating a new app or discard any changes made to an existing app (prior to tapping/clicking the ‘Save App’ button), tap/click on the ‘Close’ button at the bottom of the ‘Edit App’ screen …
![]()
Data Collector – Collapsible Sections
Using collapsible sections in Data Collector app allows you to show the complete section on the mobile app in a collapsed state. The user then is able to expand the section in the app and complete the fields as required.
Using collapsible sections is particularly useful where you have repeated sections in the app, the user can then expand the Section if required.
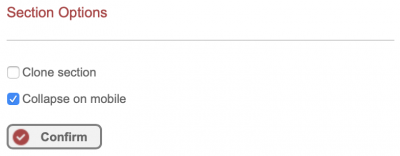
To set the section as collapsible, select the 3 dot icon after the Section name
![]()
The Section options popup will be shown. Select the ‘Collapse on mobile’ option and the choose ‘Confirm’.
On AppCan XP, the screenshot below shows the collapsed sections, if set in the Data Collector builder.
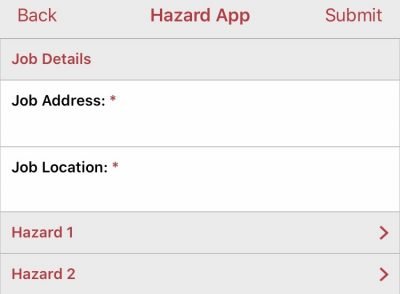
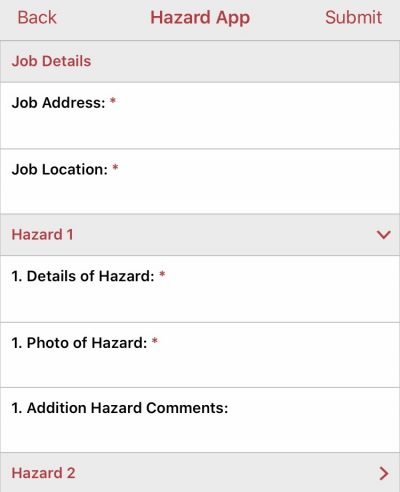
To expand a Section, select the red chevron >. To collapse a section, select the downward red chevron and the Section will collapse.
Collapsible Section Logic
- If a Section is marked as Collapsible, then any Mandatory fields are ignored (on Submit) if no fields in the section are completed. And/or the section has not been expanded.
- If a Section is marked as Collapsible, any Mandatory fields within the section are required (on Submit) if 1 or more fields in the section are completed.
- If a Section is marked as Collapsible, and any field in that Section is completed, the user is unable to collapse section (and icon hidden). If a user subsequently removes all data from fields in that Section, then icon shown and user can collapse the section again.
- If a user opens an existing record, and a collapsible Section contains completed fields, the Section is automatically shown as expanded, and expand/collapse Section icon is hidden.

