
Photo Markup
The image editor lets you easily modify images by performing actions like cropping, rotating, inserting text, drawing free-hand, and much more.
After taking a Photo, or selecting a photo from the Photo Library, click on the photo icon to open the photo(s) carousel.
Select the ‘Edit’ button at the top right of the page, for the required image, to invoke the Edit & Annotate functionality.
You will then be shown 5 options below the image:
- Text Annotation
- Freehand drawing
- Shapes (box, circle, arrow)
- Cropping and rotating
- Settings
Text Annotation
Edit an image by adding a text annotation to show useful information over an image. Also, you can make the text bold, change the font, and align, italicise, or underline your text.
Selecting the ‘Text’ icon (‘T’) at the bottom of the markup screen.

Select the ‘+ Add’ icon to add the text to the photo.

This will place a text box on the image. You can move this text box by dragging it to the required position. Tapping in the text box allows you to change the text from the default ‘Enter Text’.
You can also change the font, font colour, fill and font style by selecting the options at the bottom of the photo markup screen.
Freehand Drawings
A pen tool allows freehand drawing over an image. This feature also supports customizing stroke thickness, opacity, and the color of the pen.
After selecting the Freehand icon, you can draw on the image.

Selecting the options at the bottom of the Freehand markup allows you to set:
- Stroke size
- Colour

Shapes
You can annotate photos shapes. The available shapes are:
- Square / Rectangle
- Circle / Oval
- Line
- Single arrow
- Double arrow
- Dotted line
- Dotted single arrow
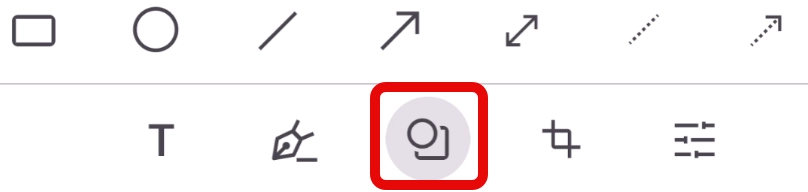
Selecting the shape option exposes the available shapes you can use on your photo.
Select the required shape. This places the shape on the photo and you can use the shape handles to adjust the shape as required.
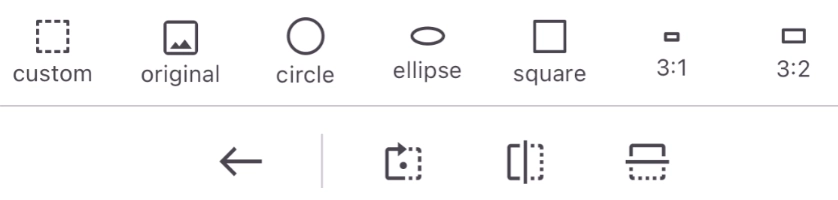
Cropping
Crop a particular region of an image to a desired size. There are many useful predefined aspect ratios available. A cropped rectangle can be resized according to an aspect ratio.
Selecting the crop icon at the bottom of the photo markup editor.

You can then choose a preset aspect ratio for the crop, or select the ‘Custom’ option (default). A crop area will appear on the image, you can move and resize the crop areas as required.
Save / Save as New
You can either ‘Save’ your annotation on the existing image, or ‘Save as New’, which duplicates the image leaving the original image unmarked.