The AppCan Cloud Report Builder is easy to use and allows you to quickly build forms which are used to print out hard copies of your data.
Using Report Builder
On selection of Report Builder from the menu, you are presented with the Report Builder grid where you can create and manage your reports.

Ribbon Bar
After the Report Builder screen opens up, a default form is displayed. By using the options on the ribbon bar, you are able to create your report.
Home

The Home ribbon bar provides the standard formatting features, including:
Undo – After carrying out an action, for instance inserting / moving a text or data field, you can use the Undo feature to restore back to the previous change made.
The Clipboard allows you to:
- Copy
- Cut
- Paste
- Delete
These are standard features used across software in general, and are particularly useful when creating forms. For instance, once you have create a Text field and made changes to the font, font size, alignment etc, you can copy and paste this to preserve the settings made, and then just adjust the level text for the new field.

Using the Font option, you can: Set the required font for your label / field. Apply Bold / Italic / Underline and strike-through to the label / field. Change the colour of your label / field.
Alignment
Within any Text or Data field, you can select how your text/data will appear in it’s container. The options available are: Left Justified Right Justified Centered Justified Text (aligned to the left and right). In addition, you can also apply the following: Top Justified Middle Justified Bottom Justified
Borders

The Borders option allows you to add a border to your label / field. By selecting the arrow on the bottom right-hand side of the Borders option, you can view the Advanced Borders options.

Text Format
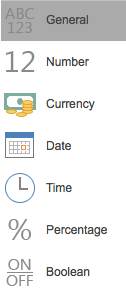
The Text Format option is useful to ensure the format of your field is shown as you require. For instance, if you have a date/time field, but only require the Date to be shown, select the ‘Date’ option from the Text Format dropdown. This will add a format mask to just show the date.
Insert

The Insert ribbon bar provides functionality to build your report, including:
A Data Band is used to output multiple rows of data. For example, if there are 100 rows of data, then the data will be output 100 times. If it is not enough space on one page, the second page will be generated and printing will be continued.
Text and Data
To insert a field or label, from the ‘INSERT’ ribbon bar select ‘TEXT & DATA’ icon and draw the required area on the form. The ‘TEXT’ popup box is shown. From this, you can either select ‘Expression’ to create a label, or ‘Data Column’ to assign a field. Text Expression: In the blank box, type the required text for your label. Data Column: Expand ReportData and choose the field you require.
Image
You can insert images into your form. These could be images captured on AppCan Mobile, or images you wish to upload from your computer (such as a logo). To insert an image, from the ‘INSERT’ ribbon bar select the ‘Imageu’ icon and draw the required area on the form. The ‘Image’ popup box is shown. From this, you can either select ‘Image’ to upload an image from your computer, or ‘Data Column’ to assign an image field. Data Column: Expand ‘ReportData’ and choose the image field you require.
Shapes
To insert a Shape, from the ‘INSERT’ ribbon bar select ‘Shape’ icon and draw the required area on the form. By default, a rectangle image is shown. You can change this by selecting the ‘Advanced’ option on the lefthand side of the form, then selecting Shape where you can change the ‘Shape Type’. Form the Advanced > Shape option, you can adjust the Style (Solid / Dash / Dot etc) and change the colour of the shape border. If you require to fill in the shape, from the ‘Appearance’ option, select ‘Brush’ and choose the required colour.
Preview

The Preview ribbon bar allows you to preview your report, and includes the following options:
Preview as HTML
Preview as HTML outputs your draft report in a separate web page. You can then share this with other users if required.
Preview as PDF
Preview as PDF (Portable Document Format) outputs your report as a PDF, in a separate window to AppCan Cloud. This is useful if you wish to share the draft report with other users, for feedback etc, before you publish the report.
Navigation
Page Navigation allows you to scroll through a number of records, so you can see how your report looks across different data.
From this, you can then make any adjustments to your report before publishing.
View Mode
View Mode allows you to:
- View ‘One Page’ at a time
- View ‘Whole Report’. This renders several pages which you can use the scroll option to quickly view a sample set of records.
Title & Logo
By default, a header is automatically created with Report Title and Logo image field, which you will need to change:

Changing the form title
Select the box that contains ‘INSERT TITLE HERE’.
You will notice an icon second from the top right of the title box.  Selecting this opens up the ‘Text’ options box. Remove the text and replace with the required text for the form title, then select ‘OK’.
Adding your logo
Select the box that contains ‘INSERT LOGO HERE’.
You will notice an icon second from the top right of the title box. Selecting this opens up the ‘IMAGE’ options box.
Select ‘Open’ and upload the required logo from your desktop, then select ‘OK’
Drag & Drop
You can ‘Drag & Drop’ fields onto your form, rather than selecting ‘Text’ and choosing the field from the ‘Data Column’ option.
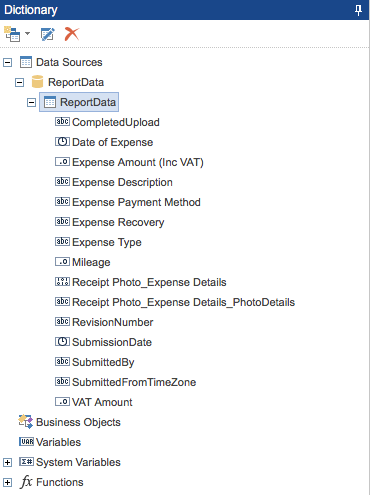
From the ‘Dictionary’ option, expand ‘Data Sources’, ‘Report Data’ and ‘Report Data’ fields to show your data fields.
Click and drag the required field on to your form. This automatically creates the field and field label. You can then position them in the correct place on the form.If you only want to create the field, but not the label, uncheck the ‘Create Label’ option, located at the bottom of the Dictionary option.
Text Fields
To insert a field or label, from the ‘INSERT’ ribbon bar:
Select ‘TEXT & DATA’ icon ![]() and draw the required area on the form. The ‘TEXT’ popup box is shown.
and draw the required area on the form. The ‘TEXT’ popup box is shown.
Inserting Fields
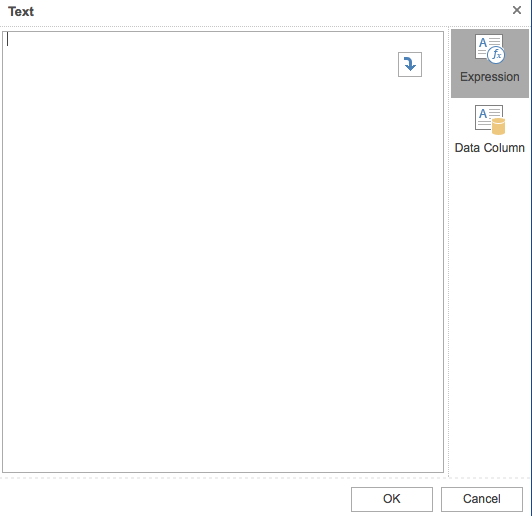
From this, you can either select ‘Expression’ ![]() to create a label, or ‘Data Column’
to create a label, or ‘Data Column’  to assign a field.
Text ‘Expression’: In the blank box, type the required text for your label.
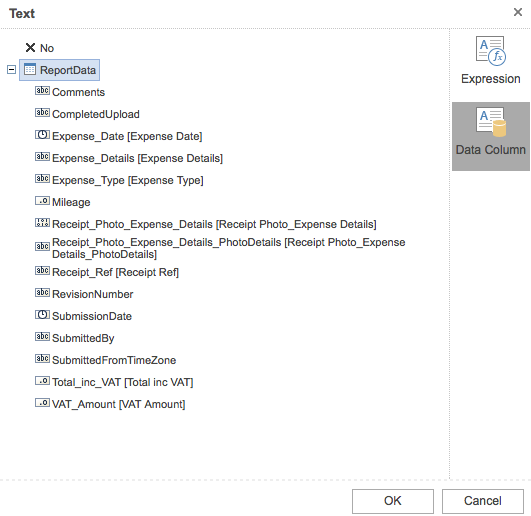
Data Column: Expand ‘ReportData’ and choose the field you require.
To insert a Shape, from the ‘INSERT’ ribbon bar select ‘Shape’  icon and draw the required area on the form. By default, a rectangle image is shown.
You can change this by selecting the ‘Advanced’ option on the lefthand side of the form, then selecting Shape where you can change the ‘Shape Type’. Form the Advanced > Shape option, you can adjust the Style (Solid / Dash / Dot etc) and change the colour of the shape border.
If you require to fill in the shape, from the ‘Appearance’ option, select ‘Brush’ and choose the required colour.
Multiple Objects
With the new Report Builder, you can now manage multiple objects.
This is a very useful feature, and allows you to apply changes / formatting to many fields in a single operation.
For instance, lets assume you want to format the font colour for multiple fields together. You can do this by selecting all the required fields.
There are 2 ways to select multiple fields:
- Select the first field you want to format, and then, using the shift key, select all other required fields with a mouse click.
- Using the mouse, left click and drag over all the required field, and then take your finger off the left click. All fields are now selected.
It is important to note, when you use the mouse drag method, make sure you drag over the a blank area of the form.
Once you have made your field selection, the selected fields will show a dotted line grid to indicate the selected fields.
You can now make the necessary changes, in this example we can change the font colour for all selected fields.
Multi-Page Reports
Multi-Page Same Page Orientation
Multi-Page Different Page Orientations
If you require your report to have multiple pages, building your form differs from the standard ‘List’ and ‘Form’ view.
IMPORTANT: Use this method of building multi-page forms when the orientation is the same for all pages.
A multi-page form uses ‘Page1’ to manage additional pages of your form, and allows you to change the order of the form pages. The creation of a multi-page form uses ‘Child’ bands and ‘Sub-Reports’.
It is still easy to build a multi-page form, following the guidance below:
- Create a new form, selecting ‘Form’ view as the ‘Report Template’
- On ‘Page1’ (default page), delete the ‘Header’ band, as this is not required for multi-page forms. You can delete this by selecting the ‘HeaderBand’ and then selecting the ‘Delete’ option from the ‘Home’ tab.
- Leave the ‘DataBand’, this is required to link your form to the required data. You can resize the ‘Databand’ so just the darker blue bar is visible.
- Using the ‘Page’ ribbon bar, add a ‘New Page’ – this will be automatically be called ‘Page2’ and is where the form will be designed and built. Add further pages as required for your form.
- Select ‘Page2’ from ‘Page’ tab on the Ribbon Bar – this is where you will build your form. There is no need to have ‘Header’ / ‘Footer’ or ‘Databands’.
- We will now link the new pages to Page1 of the Form:
- Select ‘Page1’ from ‘Page’ tab on the Ribbon Bar.
- From the ‘Insert’ tab on the Ribbon Bar, add a ‘Child’ band (located under ‘Bands’) below the ‘DataBand’.

- From the ‘Insert’ tab on the Ribbon Bar, add a ‘Sub-Report’ to the ‘Child’ band.
- Select the ‘Sub-Report’ and in the ‘Advanced’ option, in the ‘Sub-Report’ option, set the Page to the required Page number.
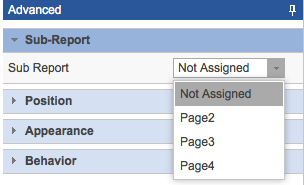
- Repeat the process to add additional pages to your form.
To enable your forms to be printed out on separate pages, you will need to:
Ensure the ‘DataBand’ ‘New Page Before’ and ‘New Page After’ are unchecked in the “Page and Column Break’ option under the DataBands Advanced options.
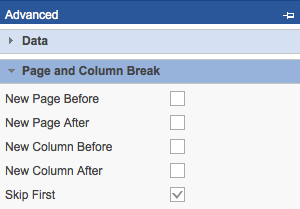
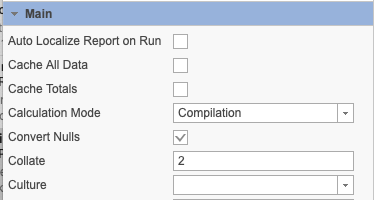
Ensure all ‘Child’ bands have the ‘New Page After’ option checked in the ChildBand’s “Page and Column Break’ option under Advanced options.

Error Checker
You can check for errors in your reports, and resolve them quickly.
There are 2 methods to check errors:
Preview the form
After you ‘Preview’ the form, if any errors are found, a popup box will appear, shown the quantity of errors.
Click on ‘More Details’ to expand on the details.
Further details of the error(s) are shown, and you can then correct them.
To locate the issue on your for, against each error, select the magnifying glass icon (), and you will shown where the error is located.
Select ‘Check for Issues’, located under ‘File’ tab and ‘Info’
You can also open the error checker by selecting ‘File’ from the menu tab, choose ‘Info’ and the select ‘Check for Issues’.
Save, Publish, Save As
You have 3 options available.
Saving your Report
To ‘Save’ your report, select ‘File’ from the Ribbon Bar tab.
You will have 2 options:
Save – This saves the report.
Close – This closes the report. If you have made changes to the report which are unsaved, you will be promoted to save those changes.
It is advised you Save your report periodically, to avoid losing changes made to your Report.
Publishing the Report
After saving your report, from the Report Builder Grid, select ‘No’ against your form in the Published column. This toggles the report to ‘published’. Assuming users have permissions to view the report for the app, they will be able to Print the report.
If you wish to un-publish the report, and remove it from the ‘Print’ option, select ‘Yes (date time)’ against your form in the Published column. This toggles the report to ‘un-published’.
Save As
You can copy an existing Report Builder form into a new report, using the ‘Save As’ feature. This clones the existing report and makes an exact copy.
To create a clone of an report, select the ‘Copy’ icon .
The ‘Save As’ popup box will be shown, where you can enter the name of the new report.
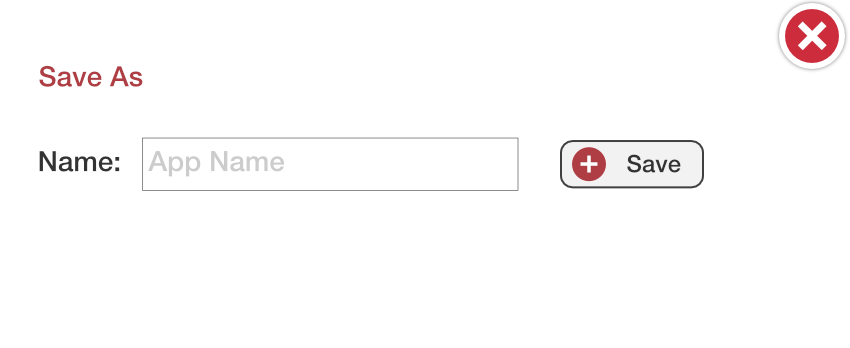
Enter the name of the new report, and select ‘Save’. Your ‘cloned’ form will appear in the Report Builder list, where you can make any necessary changes before publishing.
Advanced
The ‘Advanced’ option, located to the left of the report, allows you to access advanced features against each component you use on the report.

Select the field on your report, and then select the ‘Advanced’ option to the left of the report.
Depending on the field type selected, the ‘Advanced’ option will only show the available options for that field.
You can fix the ‘Advanced’ options to be always open. Just select the ‘pin’ icon to fix in place. To unfix the ‘Advanced’ options, select the ‘pin’ again.
Bands
The following ‘Band’ options are available:
Edit, Copy, Rename & Delete

Using the four options to the right of each Report in the Report Builder grid, you can:
Edit – This allows you to edit your report
Copy – Copy the form to a new report for the app
Rename – This allows you to change the report’s Name
Delete – This allows you to delete the report. Once deleted, you cannot recover the report.
Copy report to another App
You can now save an existing form in Report Builder, and associate it with another Data Collector app, by following these steps:
Copying an existing form:
- In the ‘Report Builder’ grid, ‘Edit’ the existing Report.
- Once the Report Builder has opened the report, select ‘File’ and then ‘Save As’
- A popup box will appear, with the existing reports File Name shown. You can either change this name or leave it as is.
- Most importantly, at the end of the File Name, you must put ‘.mrt’ as the file extension. For instance, if the File Name is ‘Health and Safety Report’, enter the ‘.mrt’ extension, so it reads ‘Health and Safety Report.mrt’.
- Select ‘OK’ – the Report will now download to your computer.
Uploading the report to a new report:
- From the Report Builder menu section, select ’Create New Report’
- Select the required ‘App’ and enter a ‘Report Name’ and then select the ‘Create New Report’ button. You should now see a blank new form, with the standard header template.
- Now, ‘Save’ the form by either selecting the save ‘floppy disk’ icon on the top left of the Form Builder, or by selecting ‘File’ and then ‘Save’ – it is important that you have saved the new form before proceeding.
- Select ‘File’ and then ‘Open’ – You should now be presented with a popup box to chose the downloaded file created in steps 1 to 5 in ‘Copy an existing report’.
- Select the Report from your computer you require to upload.
- The Report should now be available for you.
GPS Co-ordinates
In Report Builder, in addition to the combined Longitude, Latitude and Date/Time stamp field, we now provide the following fields for your report, when a ‘Location’ field is used in your app:
- Longitude co-ordinate
- Latitude co-ordinate
- Northing co-ordinate
- Easting co-ordinate
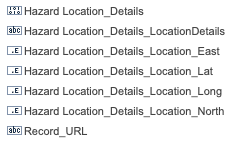
Please note: We use WGS 84 datum for Northing & Easting conversion. WGS 84 is the reference coordinate system used by the Global Positioning System.
URL View Access
In Report Builder, we provide the ‘URL View Access’ web link that can be used in your report.
The field will be shown as ‘Report_URL’

Please note: Adding the Report_URL web link will still require the user to have access to AppCan Cloud to view the record.
Alert Receipts
You can build a report for Alerts Receipts.
Field names are static for this app, and a list of fields and descriptions are shown below:
System field, where indicated, should not be used when building your report.
| FIELD NAME | DESCRIPTION |
|---|---|
| FirstName | First name of user assigned an alert |
| Message | Alerts message content |
| MessageId | System Field |
| ReadTimeStamp | Date / Time Alert Read |
| ReceivedTimeStamp | Date / Time alert Read |
| Subject | Message Subject |
| Surname | Surname of user assigned an alert |
| Username | Username of user assigned an alert |
| _Current | System Field |
| ID | System Field |
Document Receipts
You can build a report for Document Receipts.
Field names are static for this app, and a list of fields and descriptions are shown below:
| FIELD NAME | DESCRIPTION |
|---|---|
| Author | Document Author |
| AutoRead | System Field |
| DistributorName | System Field |
| Documentid | System Field |
| DocumentRead | Date / Time Document Read |
| ExistsinDatabase | System Field |
| FileName | Name of document pdf file |
| FolderId | System Field |
| FolderName | Name of Folder |
| HasNewFile | System Field |
| IsEdited | System Field |
| Keywords | Keywords used against document for search |
| LinkDisplayName | System Field |
| MimeType | System Field |
| Name | Name of Document |
| OriginalFileName | System Field |
| Published | Date / Time Document Published |
| SubFolderName | Name of Sub Folder |
| Suffix | System Field |
| ToBeDeleted | System Field |
| UserName | Name of user documents assigned to |
| ValidFrom | Date Document Valid from |
| ValidTo | Date Document Valid to |
| Version | Document Version |
| _Current | System Field |
| ID | System Field |

