There are 2 types of Variables you can use in Report Builder. ‘System Variables’ are preset variables you can use in your report, and ‘User Variables’, which allow you to create your own variable for use in the report.
System Variables
System Variables are useful code snippets, usually entered in the ‘PageFooterBand’ as a ‘Text & Data’ field, to provide useful information to the user.
This code is simple to use, and consists of text entered between to brackets {}
Below is a description of the code snippets and the result generated:
{Today} – Returns the current date the report is generated.
{Time} – Returns the current date and time the report is generated.
{TotalPageCount} – Returns the number of pages in the report generated
{PageNumber} – Returns the page number
{PageNofM} – Returns the page number and total pages in the report
{IsFirstPage} – Returns True if the page is the first page, otherwise returns False
{IsLastPage} – Returns True if the page is the last page, otherwise returns True
{Today}Returns the current date the report is generated.
User Variables
‘ User Variables’ provide temporary storage in a report and can be used to create more complex reports.
An example of why you would use a variable is shown below.
If you had an Expenses app, the normal list view would show all expense items:

If you wanted to have a summary of each ‘Expense Type’, the sum of the ‘Amount’, and the ‘Expense Notes’ shown on one line, it would normally be difficult to amalgamate the ‘Expense Notes’ from different rows into one string of text. You can however achieve this by using Variables.
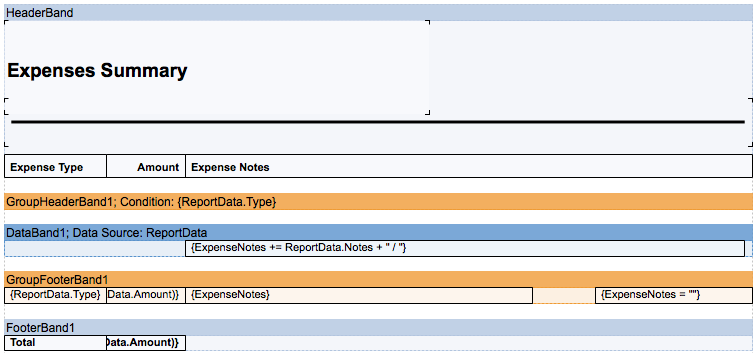
An example report is shown below:

The best way to demonstrate the use of Variables is to take you through how the above report was created.
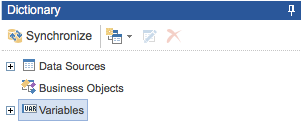
To create a Variable, select the ‘Dictionary’ option to the left of the form.
This will show the options available.

To create a new Variable, select the ‘New Item’ icon DictionaryOptionsDropdown
This will expose a list of options, select ‘New Variable’

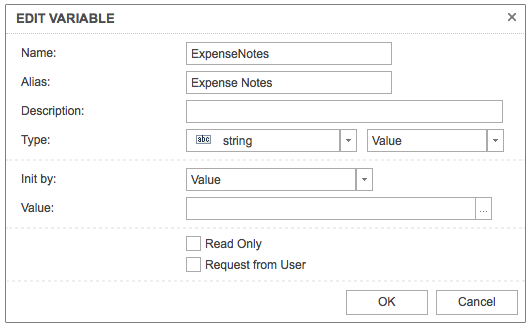
After a new Variable is created, a popup box will appear to create your variable.

When entering the ‘Name’, in this case ‘ExpenseNotes’, please ensure you don’t have any spaces in the text. The ‘Alias’ can be anything you like.
Since the ‘Expense Notes’ was a ‘Note’ field type, you will need to use a ‘String’ for the ‘Type’. All other options should be set as per screenshot above.
On completion of the new Variable, select ‘OK’.
Once a Variable has been created, you can edit the Variable by clicking on the Variable name and selecting the edit icon ![]()
Now we need to add the elements of the Variable to the form:

In the DataBand, you will need to add a ‘Text’ field to the Databand and set the value of the Variable. In this example {ExpenseNotes += ReportData.Notes + ” / “} is used. This sets the Variable ‘ExpenseNotes’ to be the field name created in the app, and uses ‘+ ” / “‘ between each Expense Note. Once you have created this, you will need to set the height of the variable field to zero (set in the properties of the field).
In the GroupFooter Band, you will need to add a field with the following expression: {ExpensesNotes =””}. This sets the value of the variable to a blank string for each ‘Expense Type’, otherwise it will amalgamate all ‘Expense Notes’ together, regardless of the ‘Expense Type’. Once you have created this, you will need to set the height of the variable field to zero (set in the properties of the field).
Finally, we need to set the actual field which will show the contents of the Variable. In the GroupFooter Band, create a new field and enter an expression of: {ExpenseNotes}

